With the initial Quilt Rack assembly done and joints cut, I was finally ready to begin shaping. I began by cutting out the template from the ¼” hardboard. I rough cut with a jig saw and then used my spindle sander to bring it to the line and massage the final shape.
 |
| I had to cut out the template before cutting out the legs. |
The template was then set on the leg/foot assemblies, and the shape transferred by tracing it with a pencil. Because I’ve been too lazy to tune up my band saw, I rough cut the legs with a jig saw. First I cut in from the edge to the line so that when I did cut the line small pieces would fall off as I went, reducing the chance of binding the blade. Then I cut just outside of the line.
 |
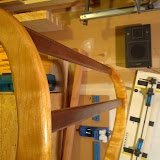
As with most classically trained quilt rack makers, I prefer to perform my
template routing in the dark. I shifted the clamps as necessary to allow the
router to go around. |
To bring the cut right to the line, I clamped on the template and routed around the leg/foot assemblies using a pattern bit. I’ve been down on my Festool routers lately due to their almost complete lack of visibility which results from a solid base and dust shrouds above and below the base. I used my OF1400 for the pattern routing, and continue to be underwhelmed. Though the dust collection continues to be good (but no better than my DeWalt DWP611 PK), it was the ratcheting spindle that really pissed me off. It works fine, until it’s time to remove the bit, then I struggle to get a good grip on the router while holding the spindle lock/ratcheting button with the same hand and the wrench with the other. I still much prefer a non-ratcheting (or even locking) spindle and a traditional too wrench setup for hand held routers. Simply align the wrenches properly and squeeze them together in one hand by making a fist and you can easily tighten or loosen a collet with a two wrench setup. No fighting to hold the router flat with one hand while twisting the wrench with the other.
 |
I wish Festool could tell me how Im supposed to hold down the green ratcheting
button and the router itself with one hand while working the wrench with my other hand.
(I know this is a photo of the bit going on. My difficulty was with taking it off). |
After pattern routing I chucked in a ½” quarter round bit and did the initial round over. This started to achieve the edge I wanted, but it was still too stiff. The next step was to throw the leg/foot assemblies in my bench vise and go at them with a rasp. I used my Auriou Grain 9 Cabinetmakers rasp and with only a little sweat I added the final bit of hand shaping that turns the uniform routed edge into a flowing, organic detail.
 |
| The legs after having the quarter round routed on the edge. |
 |
| This close up shows how the curve doesnt look organic when it just off the router. |
 |
This photo doesnt do it justice, but going over the edge with my rasp
(& then many grits of sandpaper) make the edge much more organic and pleasing. |
 |
In order to rasp the edge, I clamped the legs in my end vise, shifting them a
few times each to keep the clamping pressure near where I was rasping. |
Because the cross members are straight, the were much easier to shape than the leg/foot assemblies. Due to their narrow width I first routed the quarter round on them using a quick sled I made for my router table. I took 3 passes, each just a little deeper so as not to hog off too much material at once with the bit. Then I further defined their curves using a 5” random orbit sander and 50 grit paper.
 |
| The cross members after routing and before sanding. |
Now that the shaping is done, its time to move on to assembly next.
 |
| Quilt Rack Photo Gallery |


0 comments:
Post a Comment